Configuring static IPv6 on Windows Server®
Our Operating System is capable of automatically obtain an IP address (either by using auto configuration method, or by getting a lease from a DHCP server), but as we all know, is not a recommended method for servers or network devices.
So, I will try to explain, in a simple manner, how to configure Windows Server® to use an static IPv6 address. In this example, we will be using an ULA address (for more information on ULA and/or LA) fd36:46d4:a1a7:9d18::40
OK, lets start:
- Open Control Panel
- Select Network and Internet
- Select Network and Sharing Center
- Select Change Adapter Settings
- Choose the corresponding network card, right click on it, and select Properties
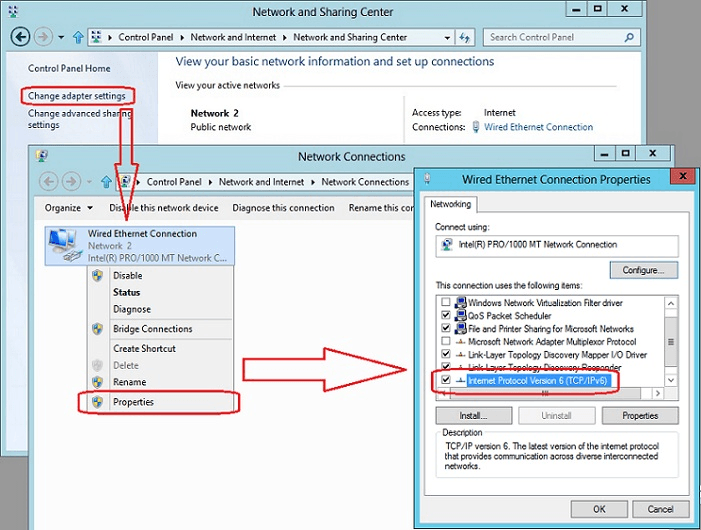
On the new window, select Internet Protocol Version 6 (TCP/IPv6) and click on Properties
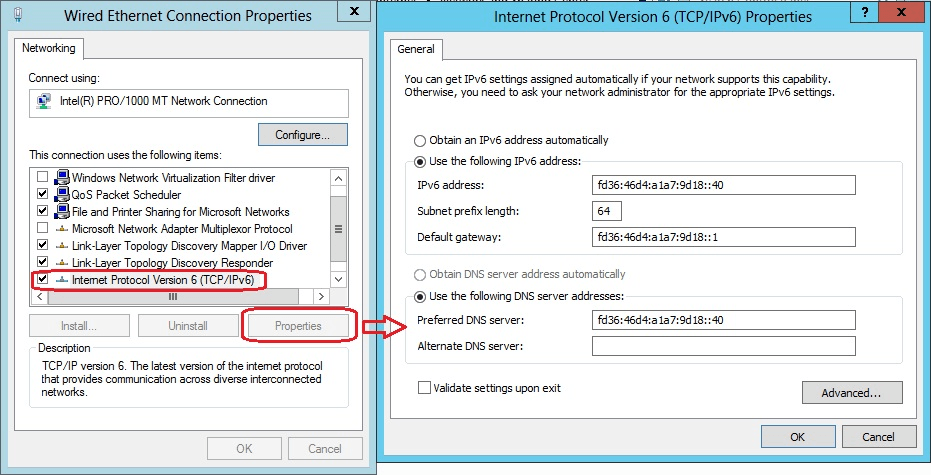
On this last window, we must configure the IPv6 address (fd36:46d4:a1a7:9d18::40), the size of the subnet prefix length (in our case the default 64 bits) and our default gateway (fd36:46d4:a1a7:9d18::1). On a different section we will explain how to configure DNS for IPv6. As is the case that DNS will be configured on top of this box, we can proceed to use the same IPv6 address as the Preferred DNS server.
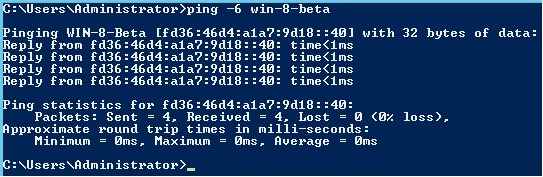
We accept all changes, and let windows to verify changes. In some cases Windows might requiere a reboot (take this into account when configuring a production server), Once the reboot has successfully restarted, we can proceed to test our brand new IPv6. We will use PING.EXE utility forcing an IPv6 answer (doing this with the -6 parameter).
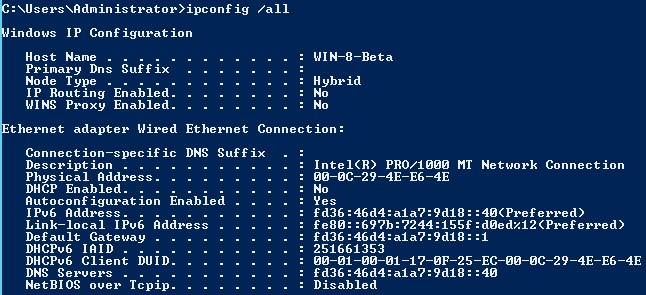
We can also use the Ipconfig utility to check our TCP/IP configuration, including IPv6.
Automate IPv6 configuration with PowerShell
Configuring a static IPv6 address on Windows Server using PowerShell is a straightforward task once you’re familiar with the key cmdlets. This method is especially useful in automated or headless environments where GUI access is limited or when managing large-scale server deployments. Before you begin, ensure you have the interface index or name of the network adapter you’re configuring. You can retrieve this using Get-NetAdapter.
To set the IPv6 address, use the New-NetIPAddress cmdlet, specifying the interface index, IPv6 address, and prefix length (which replaces the subnet mask concept in IPv6). For example, assigning the address 2001:db8:abcd:0012::c001 with a prefix length of 64 would look like this:
|
1 |
New-NetIPAddress -InterfaceIndex 12 -IPAddress "2001:db8:abcd:0012::c001" -PrefixLength 64 -AddressFamily IPv6 -DefaultGateway "2001:db8:abcd:0012::1" |
To configure DNS servers for IPv6, use the Set-DnsClientServerAddress cmdlet, targeting the same interface. You can specify one or more DNS servers like so:
|
1 |
Set-DnsClientServerAddress -InterfaceIndex 12 -ServerAddresses ("2001:4860:4860::8888","2001:4860:4860::8844") |
This setup ensures your server has a persistent and predictable IPv6 address configuration, which is essential in production networks, lab environments, and hybrid cloud setups. Always verify your configuration with Get-NetIPAddress and Get-DnsClientServerAddress to confirm settings were applied successfully.