Hyper-V, a virtualization platform developed by Microsoft, has become increasingly popular among IT professionals due to its ability to create and manage virtual machines. However, provisioning new virtual machines can be a time-consuming process. Fortunately, PowerShell, a command-line shell and scripting language, can be used to automate this task. With PowerShell, IT professionals can quickly and easily provision new virtual machines in Hyper-V environments. In this article, we will explore how to use Hyper-V and PowerShell to provision new virtual machines and simplify the process of creating and managing virtual environments for testing purposes.
LAB network & IP Addressing
Many of us have internet access at home, and we usually rely on a router to set up the right configuration for all our devices to connect to the internet. Most of the time, we use a private IP Address Class C range for this purpose. For example, we might use 192.168.1.1 with a subnet mask of 255.255.255.0. However, I don’t like to “mix” my personal devices like my computer, tablet or TV with my testing environment. That’s why I prefer to use a different range within the Private Class C address space.
To begin with, we need to “open” the subnet mask, changing it from 255.255.255.0 (24 bit mask) to 255.255.254.0 (23 bit mask). This will allow us to have a separate Class C network exclusively for our lab environment.
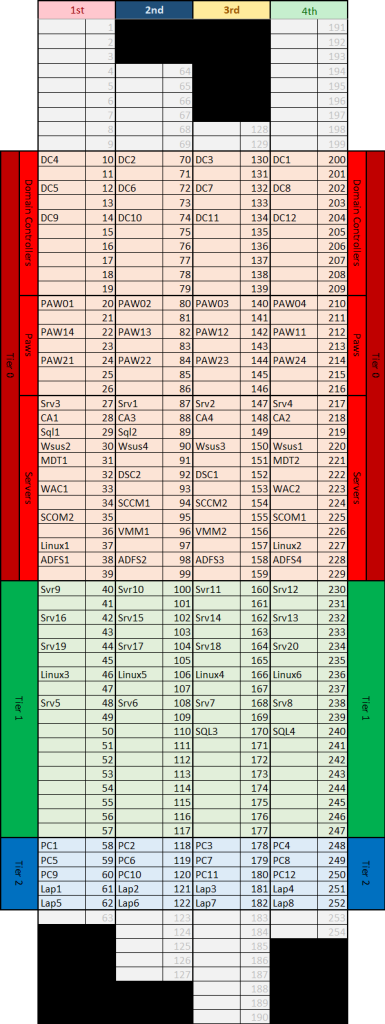
Now that we have our 192.168.0.0/24 for our virtual machines, we can distribute them accordingly. The following table does explains
On our Class C network we have up to 254 available host (first is the network address and last one is the broadcast address, so none of them are used).
I wanted to “distribute” the host evenly through all these IPs, having them as Sub-network, and try to have same last IP octet (hard task).
And within these 4 subnets, define which of those hosts are Tier0, Tier1 or Tier2.
These list does considers 3 AD forest sitting on the same IP Class C (and remember this is diferent from the one where your SmatTV- PS5, and your computer is located).
Even after defining 98 host, we still have more than 50% available for future usage… but then bigger Hyper-V machines will be required!
Powershell data file
Once we have clarified the IP Address distribution, we have to store this information on a file. This file will be parsed to our PowerShell scripts, so it can extract the corresponding values. This file was originally used as a Module Manifest file, but its ability to host data makes it a good choice. A module manifest is a PowerShell data file (.psd1) containing a hash table. The keys-value pairs in the hash table describe the contents and attributes of the module, define the prerequisites, and control how the components are processed.
as PSD1 file is a Hashtable, we can nest hash tables inside of it. First, we have to define it as a hashtable
|
1 2 |
@{ } |
Then we can start with, at least, one nested hashtable. Here I’m adding 2 arrays which will contain the nested hashtables, one for defining computers, and the other one defining the roles that a computer can have.
|
1 2 3 4 5 6 7 |
@{ AllNodes = @( ) Roles = @( ) } |
And now we can start defining the nodes, each representing a computer… but we still have one “joker” node that will apply to all of those. This one is represented with asterisk as the NodeName
|
1 2 3 4 5 6 7 8 |
@{ AllNodes = @( @{ NodeName = '*' } ) Roles = @( ) } |
So the final table will be something like:
|
1 2 3 4 5 6 7 8 9 10 11 12 13 14 15 16 17 18 19 20 21 22 23 24 25 26 27 28 29 30 31 32 33 34 35 36 37 38 39 40 41 42 43 44 45 46 47 48 49 50 51 52 53 54 55 56 57 58 59 60 61 62 63 64 65 66 67 68 69 70 71 72 73 74 75 76 77 78 79 80 81 82 |
@{ AllNodes = @( @{ NodeName = '*' DefaultGatewayIpV4 = '192.168.1.1' DefaultGatewayIpV6 = 'fd36:46d4:a1a7:9d18::1' DNS1IpV4 = '192.168.0.200' DNS1IpV6 = 'fd36:46d4:a1a7:9d18::200' TimeZone = 'Romance Standard Time' }, @{ NodeName = 'DC1' UsedRoles = @('Default', 'DomainController', 'Server') IPv4 = '192.168.0.200/23' IPv6 = 'fd36:46d4:a1a7:9d18::200/64' NetBIOSDomainName = 'EguibarIT' DnsDomainName = 'EguibarIT.local' Description = 'First Domain Controller of the EguibarIT domain' Disks = 'Multiple-Disks' } ) Roles = @( @{ RoleName = 'Default' Services = @( @{ DisplayName = 'Windows Defender Antivirus Service' Name = 'WinDefend' BuiltInAccount = 'LocalSystem' StartupType = 'Automatic' State = 'Running' Description = 'Helps protect users from malware and other potentially unwanted software' } @{ Name = 'mpssvc' BuiltInAccount = 'LocalService' StartupType = 'Automatic' State = 'Running' Description = 'Windows Defender Firewall helps protect your computer by preventing unauthorized users from gaining access to your computer through the Internet or a network.' DisplayName = 'Windows Defender Firewall' } @{ Name = 'W32Time' BuiltInAccount = 'LocalService' StartupType = 'Automatic' State = 'Running' Description = 'Maintains date and time synchronization on all clients and servers in the network. If this service is stopped, date and time synchronization will be unavailable. If this service is disabled, any services that explicitly depend on it will fail to start.' DisplayName = 'Windows Time' } ) WindowsFeatures = @( 'PowerShell', 'WoW64-Support' ) }, @{ RoleName = 'DomainController' Services = @( @{ Name = 'DNS' BuiltInAccount = 'LocalSystem' StartupType = 'Automatic' State = 'Running' Description = 'AD DS Domain Controllers Service. If this service is stoped, users will be unable to log on to the network. If this service is disabled, any services that explicitly depend on it will fail to start' DisplayName = 'Dns Server' } ) WindowsFeatures = @( 'AD-Domain-Services', 'DNS', 'RSAT-AD-PowerShell', 'GPMC' ) DcDnsIPv4 = @( '192.168.0.1', '8.8.8.8', '8.8.4.4' ) DcDnsIPv6 = @( 'fd36:46d4:a1a7:9d18::1', '2001:4860:4860::8888', '2001:4860:4860::8844' ) } ) } |
The file is located in my GithubRepository @ EguibarIT.AutoLabSetup/VM-provissioning/MainData.psd1 at main · vreguibar/EguibarIT.AutoLabSetup (github.com)
Setting up Master Images
Virtual Machines grant us the possibility to have a “master” image and use a “differential” disk that will store every single byte changed from the master. This is really helpful when fast deploying is required and it helps to save a lost of space. For example, a Windows 2022 Core image is about 14 GB on a fresh install; if we copy this disk to create 10 VMs, the used space will be around 140 GB. If instead of copying the disk, we just create a differential disk per VM, the overall size will be below 15 GB.
Doing this is very simple, and I will not explain in in detail of this post. The process is something like:
- Create a new VM
- Install Windows (any version you like)
- Fully update and patch
- Install any software you need
- Make any configuration
- Clean up image and delete temporary/unneeded files
- Run Sysprep for OOBE (Out of Box Experience). Seal the image.
- Mark the VHDX disk as “read Only”
We will do this for each OS we would like to automatically provision (Win 10, Win 11, Windows Server 2019, 2022, GUI and Core). All those masters will be located on a separated folder, just for simplicity. Those master files must be defined on the provisioning script.
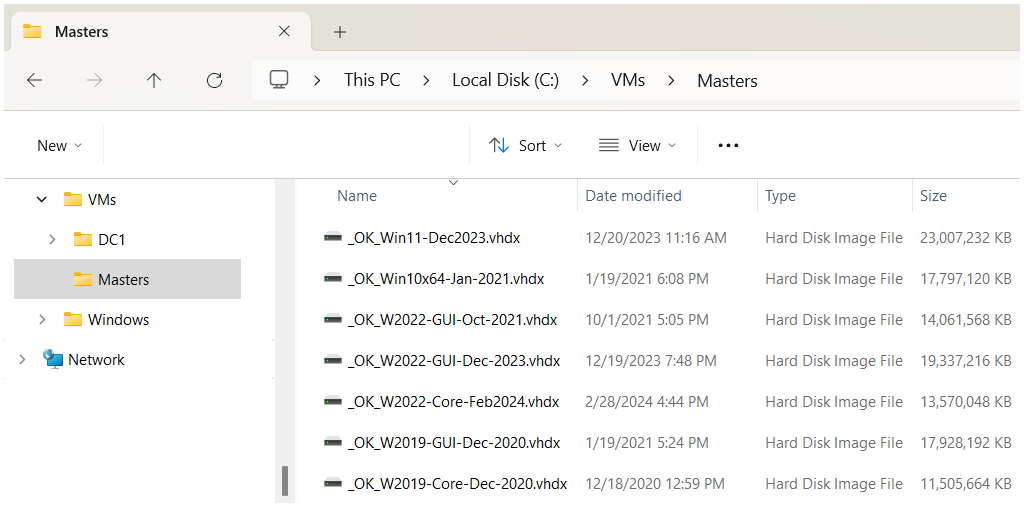
This folder structure is able to host the “Master” folder, containing all the VHDX Sysprep images, and all the actual Hyper-V VM folders of deployed images.
New-LabVM script
Now we should have all needed for starting deploying new VMs using the script. The file is located in my GithubRepository @ EguibarIT.AutoLabSetup/VM-provissioning/New-LabVm.ps1 at main · vreguibar/EguibarIT.AutoLabSetup (github.com)
The script will build the corresponding paths to master images, depending on the OS selected. BTW, OS selection is validated on the parameter name “vmOsType” and as for now it contains ‘Win10’, ‘Win11’, ‘W2k19’, ‘W2k19-CORE’, ‘W2022’, ‘W2022-CORE’. This is a mandatory parameter.
The script will be getting the required information from the PSD1 file described above
|
1 2 3 4 5 6 7 8 9 10 11 12 13 14 15 16 17 18 19 20 21 22 23 24 |
$VmFolder = 'C:\VMs' If (-not $PSBoundParameters['DataFile']) { Write-Verbose -Message 'Getting default location of Data file.' $DataFile = 'C:\VMs\MainData.psd1' } else { Write-Verbose -Message ('Using {0} Data file.' -f $PSBoundParameters['DataFile']) } # Load the PSD1 into a variable $ht try { # Read the configuration file (PSD1) $ht = Import-PowerShellDataFile $DataFile Write-Verbose -Message ('Data File {0} loaded succesfully' -f $DataFile) } catch { throw } # Process PSD1 information matching VmName if ($ht.AllNodes.ForEach({ $_.NodeName }).contains($VmName)) { #process information here } |
The Master images and associated differential disks will be defined in the following code, among other specific VM parameters. The Switch statement will define the Master image to be used based on the VmOsType parameter.
|
1 2 3 4 5 6 7 8 9 10 11 12 13 14 15 16 17 18 19 20 21 22 23 24 25 26 27 28 29 30 31 32 33 34 35 36 37 38 39 40 41 42 43 44 45 46 47 48 49 50 51 52 53 54 55 56 57 58 59 60 61 62 63 64 65 66 67 68 69 70 71 72 73 74 75 76 77 78 |
$MastersRoot = 'C:\VMs\Masters' switch ($vmOsType) { # Option 1 -> Windows 10 'Win10' { # Set the Master Disk path name #$vmVhdParentDisk = 'C:\VMs\_OK_Win10x64-27-Dec-2019.vhdx' $vmVhdParentDisk = '{0}\_OK_Win10x64-Jan-2021.vhdx' -f $MastersRoot } #----- End of Option 1 ----- # Option 2 -> Windows Server 2019 DesktopExperience 'W2k19' { # Set the Master Disk path name $vmVhdParentDisk = '{0}\_OK_W2019-GUI-Dec-2020.vhdx' -f $MastersRoot #Define memory params $MemoryStartupBytes = 2048MB $MemoryMinimum = 512MB $MemoryMaximum = 4096MB #Define CPU counts $ProcessorCount = 4 } #----- End of Option 2 ----- # Option 3 -> Windows Server 2019 CORE 'W2k19-CORE' { # Set the Master Disk path name $vmVhdParentDisk = '{0}\_OK_W2019-Core-Dec-2020.vhdx' -f $MastersRoot #Define memory params $MemoryStartupBytes = 2048MB $MemoryMinimum = 512MB $MemoryMaximum = 4096MB #Define CPU counts $ProcessorCount = 4 } #----- End of Option 3 ----- # Option 4 -> Windows Server 2022 DesktopExperience 'W2022' { # Set the Master Disk path name $vmVhdParentDisk = '{0}\_OK_W2022-GUI-Dec-2023.vhdx' -f $MastersRoot #Define memory params $MemoryStartupBytes = 4096MB $MemoryMinimum = 4096MB $MemoryMaximum = 8192MB #Define CPU counts $ProcessorCount = 8 } #----- End of Option 4 ----- # Option 5 -> Windows Server 2022 CORE 'W2022-CORE' { # Set the Master Disk path name $vmVhdParentDisk = '{0}\_OK_W2022-Core-Feb2024.vhdx' -f $MastersRoot #Define memory params $MemoryStartupBytes = 4096MB $MemoryMinimum = 4096MB $MemoryMaximum = 8192MB #Define CPU counts $ProcessorCount = 8 } #----- End of Option 5 ----- # Option 6 -> Windows 11 'Win11' { # Set the Master Disk path name $vmVhdParentDisk = '{0}\_OK_Win11-Dec2023.vhdx' -f $MastersRoot } #----- End of Option 6 ----- } # --- End of switch --- |
One of the key points on this provisioning, is the ability to set ComputerName, Ip stack (IP, DNS, Default Gateway), domain join with target OU. All this is done by generating an unattend.xml file with the correct values
|
1 2 3 4 5 6 7 8 9 10 11 12 13 14 15 16 17 18 19 20 21 22 23 24 25 26 27 28 29 30 31 32 33 34 35 36 37 38 39 40 41 42 43 44 45 46 47 48 49 50 51 52 53 54 55 56 57 58 59 60 61 62 63 64 65 66 |
if ($ipv4 -or $ipv6) { $UnattendIpConfig = @" <component name="Microsoft-Windows-TCPIP" processorArchitecture="amd64" publicKeyToken="31bf3856ad364e35" language="neutral" versionScope="nonSxS" xmlns:wcm="http://schemas.microsoft.com/WMIConfig/2002/State" xmlns:xsi="http://www.w3.org/2001/XMLSchema-instance"> <Interfaces> <Interface wcm:action="add"> <Identifier>$TmpMAC</Identifier> <Ipv4Settings> <DhcpEnabled>false</DhcpEnabled> <Metric>10</Metric> <RouterDiscoveryEnabled>false</RouterDiscoveryEnabled> </Ipv4Settings> <Ipv6Settings> <DhcpEnabled>false</DhcpEnabled> <Metric>10</Metric> <RouterDiscoveryEnabled>false</RouterDiscoveryEnabled> </Ipv6Settings> <UnicastIpAddresses> <IpAddress wcm:action="add" wcm:keyValue="1">$IPv4</IpAddress> <IpAddress wcm:action="add" wcm:keyValue="2">$IPv6</IpAddress> </UnicastIpAddresses> <Routes> <Route wcm:action="add"> <Identifier>0</Identifier> <Metric>10</Metric> <NextHopAddress>$DefaultGatewayIpV4</NextHopAddress> <Prefix>0.0.0.0/0</Prefix> </Route> <Route wcm:action="add"> <Identifier>1</Identifier> <Metric>10</Metric> <NextHopAddress>$DefaultGatewayIpV6</NextHopAddress> <Prefix>::0/0</Prefix> </Route> </Routes> </Interface> </Interfaces> </component> <component name="Microsoft-Windows-DNS-Client" processorArchitecture="amd64" publicKeyToken="31bf3856ad364e35" language="neutral" versionScope="nonSxS" xmlns:wcm="http://schemas.microsoft.com/WMIConfig/2002/State" xmlns:xsi="http://www.w3.org/2001/XMLSchema-instance"> <Interfaces> <Interface wcm:action="add"> <Identifier>$TmpMAC</Identifier> <DNSServerSearchOrder> <IpAddress wcm:action="add" wcm:keyValue="1">$DNS1IpV4</IpAddress> <IpAddress wcm:action="add" wcm:keyValue="2">$DNS2IpV4</IpAddress> <IpAddress wcm:action="add" wcm:keyValue="3">$DNS3IpV4</IpAddress> <IpAddress wcm:action="add" wcm:keyValue="4">$DNS4IpV4</IpAddress> <IpAddress wcm:action="add" wcm:keyValue="5">$DNS5IpV4</IpAddress> <IpAddress wcm:action="add" wcm:keyValue="6">$DNS1IpV6</IpAddress> <IpAddress wcm:action="add" wcm:keyValue="7">$DNS2IpV6</IpAddress> <IpAddress wcm:action="add" wcm:keyValue="8">$DNS3IpV6</IpAddress> <IpAddress wcm:action="add" wcm:keyValue="9">$DNS4IpV6</IpAddress> <IpAddress wcm:action="add" wcm:keyValue="10">$DNS5IpV6</IpAddress> </DNSServerSearchOrder> <DNSDomain>EguibarIT.local</DNSDomain> <DisableDynamicUpdate>false</DisableDynamicUpdate> <EnableAdapterDomainNameRegistration>true</EnableAdapterDomainNameRegistration> </Interface> </Interfaces> <DNSSuffixSearchOrder> <DomainName wcm:action="add" wcm:keyValue="1">EguibarIT.local</DomainName> </DNSSuffixSearchOrder> </component> "@ } else { $UnattendIpConfig = $null } |
And identifying the target OU to be used when joining the computer to the domain
|
1 2 3 4 5 6 7 8 9 10 11 12 13 14 15 16 17 18 19 20 21 22 23 24 25 26 27 28 29 30 31 32 33 34 35 36 37 38 39 40 41 42 43 44 45 46 47 48 49 50 51 52 53 54 55 56 57 58 59 60 61 62 63 64 65 66 67 68 69 70 71 72 73 74 75 76 77 78 79 80 81 82 83 84 85 86 87 88 89 90 91 92 93 94 95 |
# Get Domain DN [string]$AdDn = $DnsDomainName $AdDn = 'DC={0},DC={1}' -f $AdDn.split('.')[0], $AdDn.split('.')[1] # Tier0 OUs switch -wildcard ($VmName) { # PAWs 'Paw0*' { $DestOU = ('OU=PawT0,OU=PAW,OU=Admin,{0}' -f $AdDn) } 'Paw1*' { $DestOU = ('OU=PawT1,OU=PAW,OU=Admin,{0}' -f $AdDn) } 'Paw2*' { $DestOU = ('OU=PawT2,OU=PAW,OU=Admin,{0}' -f $AdDn) } # Tier0 { ($_ -eq 'Adfs*') -or ($_ -eq 'Ca*') -or ($_ -eq 'Dsc*') -or ('Linux1', 'Linux2' -contains $_) -or ($_ -eq 'Mdt*') -or ($_ -eq 'Sccm*') -or ($_ -eq 'Scom*') -or ('SQL1', 'SQL2' -contains $_) -or ('Srv1', 'Srv2', 'Srv3', 'Srv4' -contains $_) -or ($_ -eq 'Vmm*') -or ($_ -eq 'Wac*') -or ($_ -eq 'Wsus*') } { $DestOU = ('OU=InfraT0,OU=Infra,OU=Admin,{0}' -f $AdDn) } #Tier2 { 'PC1', 'PC4', 'PC7', 'PC10' -Contains $_ } { $DestOU = ('OU=Desktops,OU=BAAD,OU=Sites,{0}' -f $AdDn) } { 'PC2', 'PC5', 'PC8', 'PC11' -Contains $_ } { $DestOU = ('OU=Desktops,OU=GOOD,OU=Sites,{0}' -f $AdDn) } { 'PC3', 'PC6', 'PC9', 'PC12' -Contains $_ } { $DestOU = ('OU=Desktops,OU=UGLY,OU=Sites,{0}' -f $AdDn) } { 'Lap1', 'Lap4', 'Lap7' -Contains $_ } { $DestOU = ('OU=Laptops,OU=BAAD,OU=Sites,{0}' -f $AdDn) } { 'Lap2', 'Lap5', 'Lap8' -Contains $_ } { $DestOU = ('OU=Laptops,OU=GOOD,OU=Sites,{0}' -f $AdDn) } { 'Lap3', 'Lap6', 'Lap9' -Contains $_ } { $DestOU = ('OU=Laptops,OU=UGLY,OU=Sites,{0}' -f $AdDn) } Default { $DestOU = ('OU=Quarantine-PC,{0}' -f $AdDn) } } # Domain Controllers If ($VmName -like 'DC') { $DestOU = ('OU=InfraStaging,OU=Infra,OU=Admin,{0}' -f $AdDn) } # Tier1 OU If ('Srv5', 'Srv6', 'Srv7', 'Srv8', 'Srv9', 'Srv10', 'Srv11', 'Srv12', 'Srv13', 'Srv14', 'Srv15', 'Srv16', 'Srv17', 'Srv18', 'Srv19', 'Srv20' -Contains $vmName) { $DestOU = ('OU=Servers,{0}' -f $AdDn) } If ('SQL3', 'Srv4' -Contains $vmName) { $DestOU = ('OU=Sql,OU=Servers,{0}' -f $AdDn) } If ('Linux3', 'Linux4', 'Linux5', 'Linux6' -Contains $vmName) { $DestOU = ('OU=Linux,OU=Servers,{0}' -f $AdDn) } # Domain Join section of the Unattend file If ($VmName -ne ('DC1' -or 'DC5' -or 'DC9')) { $UnattendDomainJoin = @" <component name="Microsoft-Windows-UnattendedJoin" processorArchitecture="amd64" publicKeyToken="31bf3856ad364e35" language="neutral" versionScope="nonSxS" xmlns:wcm="http://schemas.microsoft.com/WMIConfig/2002/State" xmlns:xsi="http://www.w3.org/2001/XMLSchema-instance"> <Identification> <Credentials> <Domain>$DnsDomainName</Domain> <Password>P@ssword 123456</Password> <Username>TheUgly</Username> </Credentials> <JoinDomain>$DnsDomainName</JoinDomain> <MachineObjectOU>$DestOU</MachineObjectOU> </Identification> </component> "@ } else { $UnattendDomainJoin = $null } |
Before finalizing the VM setup and powering it on, ensure that Windows (this part residing on the newly generated differential disk of the VM) is mounted on the VHDX disk, transfer the previously mentioned Unattend.xml file, set Windows to utilize the file during the next boot, and then dismount the VHDX disk.
|
1 2 3 4 5 6 7 8 9 10 11 12 13 14 15 16 17 18 |
# Copy the above unattend to VHDX C:\Windows\Panther\unattend.xml (Alternatively to C:\Windows\System32\Sysprep\Unattend.xml) # Set-Content -Value $unattend -Path ('{0}:\Windows\Panther\unattend.xml' -f $mount.Trim()) Write-Verbose -Message 'Creating Unattend.xml file on new VM.' Set-Content -Value $unattend -Path ('{0}\Windows\Panther\unattend.xml' -f $TempMount) Write-Verbose -Message 'Copy of Unattend.xml file created on C:\VMs\Unattend-01-01-1600.xml' Set-Content -Value $unattend -Path ('C:\VMs\Unattend_{0}.xml' -f (Get-Date -Format 'dd-MMM-yyyy')) # Make windows to use the unattend.xml file #Use-WindowsUnattend -Path ('{0}:\' -f $mount.Trim()) -UnattendPath ('{0}:\Windows\Panther\unattend.xml' -f $mount.Trim()) -LogLevel WarningsInfo Write-Verbose -Message 'Sealing image after apply Unattend.xml' Use-WindowsUnattend -Path $TempMount -UnattendPath ('{0}\Windows\Panther\unattend.xml' -f $TempMount) -LogLevel WarningsInfo #Dismount Image Dismount-DiskImage -ImagePath $vmVhdNewDisk -StorageType VHDX # Remove the mountPoint Remove-Item $TempMount -Force |
Here’s another way to easily provision VMs, incorporating them into my automated deployment setup. While there are various methods available for this task, feel free to explore and enhance them further. It’s all about embracing opportunities for more enjoyment!